NEXttUNE

সময়ের সাথে প্রযুক্তি এখন আমাদের হাতে।

Blog Archive

  • ▼  2013 (11)
    • ▼  March (1)
      • আসুন GP তে ফ্রী নেট ব্যবহার করি ফুল স্পীডে। No VPN
    • ►  January (10)
  • ►  2012 (61)
    • ►  December (24)
    • ►  November (37)
Powered by Blogger.
  • Home
  • Features
    • Shortcodes
    • Sitemap
    • Error Page
  • Seo Service
  • Documentation
  • Download This Template

CATEGORY >

Showing posts with label tips tune. Show all posts
this day and age, talking about registry changes and modifications on XDA sounds like a flashback to the very, very distant past. After all, unless you are fully unlocked or at the very least interopunlocked, WP7 will not let you anywhere near close this magical pool of resources to make your device better. With the advent of Windows 8, people have been working hard throughout the net to make the new upcoming computer and tablet-friendly OS more usable and to customize it to everyone’s liking. If you are into modding your Windows 8 wielding laptop, here is a fun tweak that you can try. XDA Forum Member SkyKOG posted a very easy guide to add a very important missing option to the right click context menu: the ability to shut down or reboot the device. This will actually save you from having to navigate yourself through the “Charms Bar.” As if the guide were not easy enough to follow, the dev was kind enough to upload a .reg file with the change already made for those of you who are not familiar with regedit or who are simply too lazy to actually do it yourselves. We strongly recommend that you make a backup of your current registry, just in case you decide to go around messing with the computer’s internals without knowing what you are doing. This will definitely save you from having to go through a time consuming OS repair process should something go wrong. Please leave some feedback if you have any. Shutdown and Restart in your right click context menu
Share on:
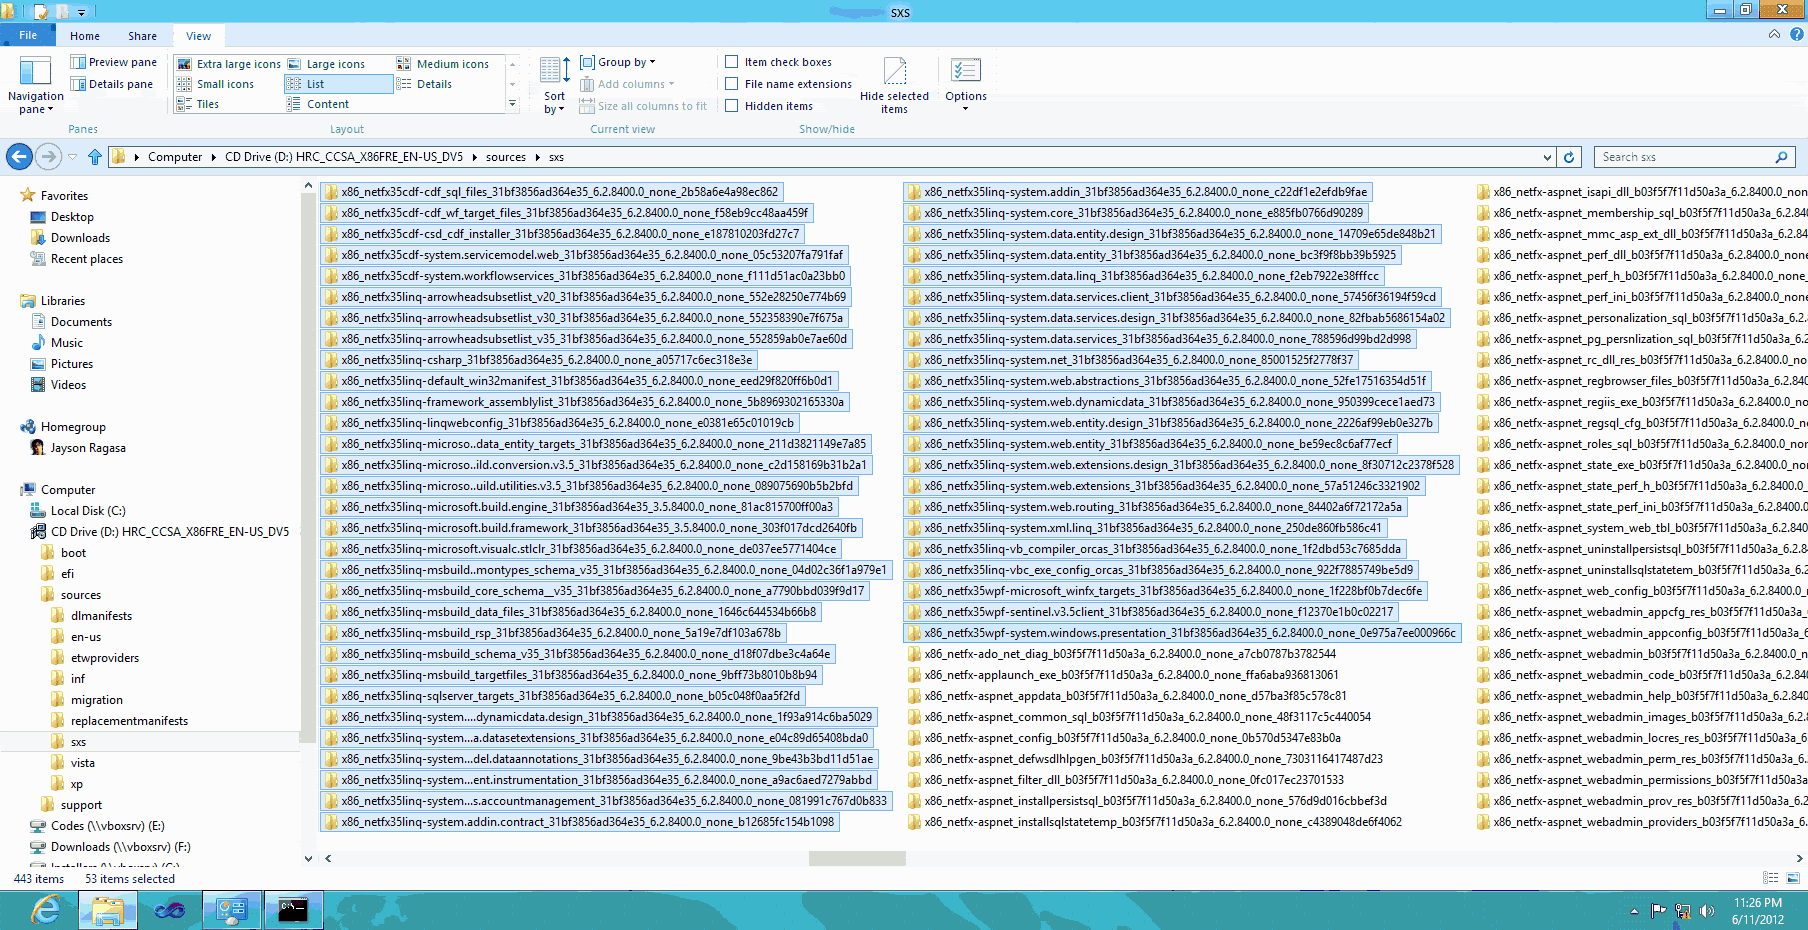
Yes you can install .Net Framework 3.5 in Windows 8 offline. The .Net 3.5 package is already included in the ISO but installing it requires an elevated command prompt which means you have to run the command prompt as an Administrator and run Deployment Image Servicing and Management Tool (dism.exe)
Click the image for larger picture
as you can see on the image, Windows 8 installer has x86_netfx35~~~


So after running the command prompt. Type
dism /online /enable-feature /featurename:NetFx3 /all /source:<w8_setup_drive>\sources\sxs


Then wait until it completed successfully.


Share on:

Camera Mouse is a free program that allows you to control the mouse pointer on a Windows computer just by moving your head. Clicking can be done by making the mouse pointer dwell over a spot on the screen.


                         <<<<<<<<<<<     Download Link   >>>>>>>>

The program was developed at Boston College to help people with disabilities use the computer. The main audience for this program is people who do not have reliable control of a hand but who can move their head. People with Cerebral Palsy, Spinal Muscular Atrophy, ALS, Multiple Sclerosis, Traumatic Brain Injury, various neurological disorders use this program and its predecessors to run all types of computer software.


Camera Mouse works as a mouse replacement system for Windows computers so it should work with just about any application program. For example people use Camera Mouse with entertainment programs, education programs, communication programs, web browsers, and so on. (See the Downloads page for some of the programs and websites that we have used with Camera Mouse.) Camera Mouse works best with application programs that require only a mouse and a left click and that do not have tiny targets. It's easier to use Camera Mouse with application programs that do not require extreme accuracy.
What equipment is required? A Windows 8, 7, Vista, or up to date XP computer system and a standard USB webcam (or a webcam built into the computer or monitor). We do our development work with a Logitech HD Pro Webcam C920 or a Microsoft LifeCam Studio HD. Camera Mouse works with other commercial USB webcams as well.
This program is available for free download. Support for our work has come from the Philanthropy Committee of Mitsubishi Electronic Research Labs (MERL) and the Mitsubishi Electric America Foundation. Major continuing support for Camera Mouse comes from Boston College. Camera Mouse is part of our mission of education, research, and service.
The original idea for Camera Mouse was developed by Prof. James Gips (Boston College) and Prof. Margrit Betke (then at Boston College, now at Boston University). Here are copies of papers on the original Camera Mouse from the 2000 RESNA Conference [pdf] and from IEEE Transactions on Neural Systems and Rehabilitation Engineering in 2002 [pdf]. Many students have contributed to the development of Camera Mouse.


For several years the Camera Mouse technology was licensed by Boston College to a start-up company called Camera Mouse, Inc., with headquarters in Texas. They developed a commercial version of the program that they sold for $395. The company could not sell enough copies to be profitable.
With the demise of the company and the revocation of the license by Boston College, we decided to develop a new version of the program and make it available for free. Under contract from Boston College, Donald Green, principal at Mekinesis, developed and implemented Camera Mouse 2007. Don expanded Camera Mouse 2008 to work with a much wider variety of commercial webcams. Camera Mouse 2009, 2010, and 2011 are much smaller downloads and work on computers with multiple video sources. Under contract from Boston College, Don Green and Christine Hsu Nason of OpCode Consulting and Matt McGowan did a complete rewrite for Camera Mouse 2012. Camera Mouse 2013 follows closely to Camera Mouse 2012.
The latest version is Camera Mouse 2013 version 1.0 released November 19, 2012. Manual dated November 10, 2012.
There have been over 1,000,000 downloads of Camera Mouse from this site since the program was made available in June 2007.
Share on:

A Shortcut to Turn Off the Internet

Should you ever wish to “forcefully” step away from the Internet for a while, the Toggle Internet script will make the task a little easier for you. This little script will completely disable the Internet on your Windows computer with a click and you can restore the Internet connection anytime later with, again, a click.

Disable Internet Connection


To give this a try, download Toggle-Internet.bat on your desktop, right click, choose “Run as Administrator” and you’ll be instantly disconnected from the Internet. Later, when you need to reconnect, just right-click the same file and run as an admin as before.
Internally, the script merely toggles the status of your Network Adapter (also known as the LAN adapter or Ethernet card) thus shutting down the Internet for you. If you were to disable or enable the Network Adapter manually, the steps would be Control Panel -> Network and Internet -> View Network Status -> Change Adapter Settings.
One more thing. Toggle Internet will block all sites but should you wish to disable access to just a select groups of distracting websites while staying connected to Google Docs or your email, use Let Me Work. You can specify the list of sites that should be blocked and this script will modify the Windows HOSTS file to shut them off, temporarily.
Share on:
The Windows key is probably the most important key in Windows 8 since it is part of so many new keyboard shortcuts.
Now if you have been using an old keyboard that doesn’t have a dedicated Windows key or if you would like to add another Windows key to your  keyboard for ease of access, what you can do is remap the rarely-used CAPS lock key and turn it into a Windows key. Here’s how:

http://www.youtube.com/watch?feature=player_embedded&v=cGBBEkfH4Eo


Remap the CAPS Lock Key in Windows

To remap any key in Windows, you need to make certain changes to the Windows registry. Since this can be intimidating to most users, there are tools available that let you map one key to another without fiddling with the registry.
Sharpkeys and Microsoft Keyboard Layout Creator are popular programs that perform key remapping but I prefer ScanMapSet since it requires no installation and once the required keys have been mapped, you can just delete the utility.
  1.  Download the scanmapset.exe file and put it in, say, c:\temp folder.
  2. Open the Command Prompt in Windows as an administrator (video tutorial).
  3. Switch to the temp folder (using cd) and run the following command.
scanmapset.exe -s capslock=lwindows
Restart your Windows computer and the CAPS lock key will now function as a Windows key.
[*] If you are trying to map a key in Windows 7 or Vista, see this tutorial on how to open the Command line as an administrator.
Share on:
There are couple of ways by which you can retrieve files stored on your home computer from anywhere else using a regular Internet connection.Option 1: Using Online Backup
You can use an online backup service like SugarSync, Carbonite, SkyDrive or even Dropbox – they provide desktop utilities that will automatically upload files on your home computer to the Internet and you can then access these files through the web browser of any other Internet connected computer.
The upside is that your files will always be available to you even if the home computer is not running. SugarSync and Carbonite have a mobile optimized website so you can access files from any mobile phone as well.
The downside is that if you are using any of these services for the first time, you’ll to wait until they upload all your data to the cloud and this process may take long if you have too many files on the home computer


Option 2: Using Desktop Sharing Software
There are free desktop sharing software like TeamViewer and UltraVNC that also let you remotely access your computer files from anywhere else. LogMeIn Pro is another good option for transferring files from a remote computer but these are paid services.
If all your computers are running Windows, you can use the built-in remote desktop connection feature of Windows (available in XP and later) to access your home computer from another Window computer over the Internet.
With Desktop Sharing software, you’ll always have access to all your files but one big limitation is that it requires that the remote computer stays on. Also, none of these options will help you access files on a mobile phone except LogMeIn which has an iPhone app.
Option 3: Access Files Directly through the Browser
Online backup services, discussed above, will copy files to their own servers before you can access them for anywhere else. Screen sharing services are often slow and they won’t work on most mobile devices. Let’s now explore another set of services that allow you download files directly from the home computer.
Copernic, like Google Desktop, is a popular desktop search software that you may use to find emails, documents and other files on your Windows computer. They have a paid component called myCopernic on the Go that lets you remotely search for content stored on the home or office computer. You can preview the search results and then download them to your mobile phone or remote PC.
With Opera Unite, you can easily turn your computer into a web server and instantly access files and folders on that computer from any other web browser (including that of mobile phones). Opera Unite is a standard web server and therefore you’ll be downloading files directly from the computer – they’re not uploaded anywhere else.
Another option is GBridge that lets you setup a virtual private network using your existing Google Account. Companies use VPNs to let employees access corporate data over a public network (Internet) and with GBridge, even home users can build their own VPNs to access remote files more securely.
Windows Live Sync at sync.live.com is another great choice for remotely accessing files over the Internet. Just install the Live Sync client on your computer and you can then access the entire hard drive of that computer simply through the Windows Live Sync website.
Finally, you may also want to check out HomePipe – this is an extremely easy and free service that lets you access your home files and media from any other computer or mobile phone. Install the HomePipe Agent and all files on that computer will instantly become available through the web. They also have apps for iPhone and Android phones.

Share on:
If you are to share a large file with someone over the Internet, there are generally two options – you can either attach the files to an email message or, if the files are too big to fit in an email program, you can upload them to an online storage service and then share the download links with the recipient.
Let’s now explore some of the popular services that’ll make it easy for you to transfer large files over the Internet without any hassles or costs.


A: Share Large Files over Email

The Gmail service cannot handle email attachments that are larger than 25 MB but the recently-revamped Hotmail service is a much better alternative as it lets you send email messages as large as 10 GB.
The maximum size of an individual file that you can attach to an Hotmail message is only 50 MB but you can use a file-splitting utility like HJ-Split to break a big file into smaller chunks and then attach them all to a single message. The recipient can then join these chunks to restore the original file and he can do without requiring external programs.

Chart: Comparison of file sharing services

File Sharing - Size Limit

B: Share Large Files without Email

The downside with email attachments is obvious – most ISPs and web-based email programs (including Gmail) will reject incoming messages that have big attachments and therefore, if you are sending a bulky file via email, the recipients also have to be on Hotmail as well in order to receive that file.
One of the best options for sharing large files without email is Dropbox. Once you install the the Dropbox utility on your (Windows, Mac or Linux) desktop, you can upload files of virtually any size to the Internet – it’s only limited by the size of your Dropbox storage which is 2GB in the case of free accounts. Alternatively, if you don’t want to install Dropbox, you can upload files straight to the Dropbox website from your browser but the limit in this case is 300 MB per file.
You can even consider using Google Docs to share those big files over the Internet. Google Docs lets you upload files up to 250 MB in size and they can be in any format. You have 1 GB of free storage space for storing all the non-Office files on Google Docs but you can also buy more space for a reasonable fee.
Unlike FTP servers, services like Google Docs and Dropbox don’t support resumable downloads. That means if the connection breaks while the recipient is still trying to download your “huge” file, he or she will have to resume the download from scratch. That can be a deal-breaker for lot of people.
SkyDrive, part of the Windows Live family, can solve this problem in a way.
The service offers 25 GB of free online storage, with individual files limited to 50 MB. To upload a large file, split it into chunks of 50 MB each and then upload them all to a single folder on SkyDrive. The recipient can download the entire folder as a ZIP or, if he’s on a flaky connection, he can download files one by one and then join them all at his end.

C. Share Files without Registration

Finally, if you are looking for something quick and simple that doesn’t even require registration, talk to YouSendIt or WeTransfer (if the file size is really big). Just upload the files via the browser, enter the email address of the recipient and hit send. WeTransfer lets you send files up to 2 GB in size while the maximum allowed limit is 100 MB in the case of YouSendIt (free version).
Share on:
Step 1: Most computers have an S-Video port that can be connected to the S-Video input of your TV screen using a very cheap S-Video cable (this cable is round with 4 or 7 pins). If you have an older monitor, you can use the 15-pin VGA cable to connect the computer to the TV and it will offer better picture quality than the S-Video cable.
s video
S-Video Cable
vga cable
VGA Cable
DVI Cable
DVI Cable
The newer HDTVs and laptop computers have DVI ports so a DVI Male to Male Cable or DVI to HDMI Adapter Cable can be used to hook the computer display and the TV. The DVI to HDMI cable can be used when your HDTV doesn’t have an DVI port but does have an HDMI port.

Connect the Audio RCA Cable for Sound

Step 2: Now that you have connected the computer to the TV using a physical cable, you need another cable to transmit the sound as all the above cables only transmit the video but not the audio part.
rca_audio
Mini to RCA Audio Cable
You need a 3.5mm Mini Plug to RCA Cable Stereo to connect the audio line out from a notebook to your TV. The red cable connector goes into the red socket of your TV, black connector into the black socket while the black connector goes into the 3.5mm headphone jack of your computer.
Step 3: Open the “display settings” on your Windows computer and activate the output to the TV screen. You can either mirror content of your computer on the TV or extend the display just like a dual monitor screen.
If you are using Windows 7, press the keyboard shortcut Windows + P to quickly access the display settings or search for “Connect to External Display” in the Windows Run box.
Step 4: Pick up your TV remote and switch to “External Inputs” from the menu. You will need to change the default “Video 1″ to a different selection which may be “HDMI 1″ or “Video 2″ depending on how you have made the connection.
Important: Make sure that you connect the physical cable to the TV before turning on the computer as sometimes it may fail to recognize external display. You may also need to change the screen resolution of your TV using the Display settings in your Control Panel else the picture may sometimes appear distorted.
Share on:
With Cameyo's application virtualization, you can package an entire application - including all its files, DLLs, registry - into one single file and take it with you anywhere, along with the app's settings & data.
On your Dropbox drive, on a USB stick, at work, at home, on your laptop - using application virtualization you will no longer have to reinstall your apps again and again everytime you move from one computer to another. Virtual portable apps also keep your computer stable, isolating apps from your system. Whether your are a home user or an IT administrator, Cameyo will save you precious time... and frustration.


Share on:

www.deathdate.info is someone's idea of a crude though elaborate joke. The site portends to calculate your death date (yes, there is a sophisticated calculator too) on your filling up a form and entering your data. And lo and behold! You get information on when will your time come! The site also tells you what will you be in your next life! Ha Ha... Check out deathdate.info here for your death date!


FIND OUT YOUR DEATH DATE. Terms and Conditions. The years you have lived can provide a clue to finding out your date of death.Death Date is a mysterious place where you will find out when you are going to die... but do you have the guts?
Please fill out this form, don't be afraid to share your data - it's necessary only for your Death Date calculations, the only thing you should be concerned about is ..........................................


                                   Lets Find Out UR Death Date!!                                                     


Share on:
Hey, frnds r u getting bored? R u in problem? Don't fell alone. Because god is here & also he is online for u. So, let's some fun with god.


I tried the link practically because I’m really bored. But I didn’t expect that he’s not fooling around when he said that I’m gonna Chat With God.


Well, it was a very neat site. You can choose a skin for your chat window. I chose Cadillac Pink. The other colors were Brushed Metal and Heavenly Blue.Afterwards, an angel connected me to God. I noticed one of the text in the site. It says “Repenting made easy”.
So if ever you happen to be bored at home or in the office, why not have a small talk with God? Who knows… this so-called God might be able to really answer what’s bothering you now.


Lets Chat With GOD !!
Share on:
Disposable email account also known as a temporary email address is an email account that you can create to fulfill a temporary need that may contain potential risks. If the temporary email gets compromised in any way or if it is abused by a third party, you can simply dispose of it to avoid any problems.


If there is a site you want to join and it’s asking for your email account, if you want to avoid getting hundreds of spam mails in your real account every day, you can set up a temporary email to use in such situations. So when you use a disposable account to sign up for a particular website, you are using an alias of your real email account. Every such alias is made specifically for a single mailing list or site which then gets associated with the disposable email account. Due to this when you get spam in your mail, you will know exactly what its source was.

Overall a temporary email is quite a boon that can protect your real account and have it uncluttered. Of course this function shouldn’t be used for any malicious purposes and should be used responsibly. With great power comes great responsibility.

>Go to Temporary E-Mail<
Share on:
GodMode is a Hidden Features of Windows Vista, 7 and 8. The GodMode is the easiest way to use your Control Panel & also easy to create. It is nothing but a centralized Control Panel. The most funny thing is the creation of GodMode is like a magic. So my visitors I recommend you to run for it.
 

Supported Operating Systems:

  • Windows Vista
  • Winsows 7
  • Windows 8

How to Create?

  • Create a New Folder in Desktop
  • Right Click On it and click on Rename
  • Rename it to "GodMode.{ED7BA470-8E54-465E-825C-99712043E01C}"
After completing these three steps your folder icon will be changed to Control Panel icon. So you have done the job successfully.
Note: You Can use Any name in the place of "GodMode"
Share on:
MozBackup is simple applicaion for create & restore a backup file for mozilla products. For Mozilla Firefox there is a option (Firefox Sync) to create buckup online. But, it is very hard to normal users & it is also irritating for the users who use internet in low bandwidth. MozBackup is a very useful & handy tool for this job.


Supported Applications:

  • Firefox
  • Thunderbird
  • Sunbird
  • Flock
  • Postbox (Express)
  • SeaMonkey
  • Mozilla Suite
  • Spicebird
  • Songbird
  • Netscape
  • Wyzo

Supported Operating Systems:

  • Windows 98
  • Windows ME
  • Windows NT
  • Windows 2000
  • Windows XP
  • Windows 2003
  • Windows Vista
  • Windows 7
  • Windows 8
 It's application freeware even for Business use. So, use it without any confusion!!


Share on:
Hey guys, from now don't be worried for accidentally deleted files, even it is deleted from Recycle bin. Piriform Ltd launched a freeware file recovery software. There are many software for this job but, most of the software are shareware. I already used this software to recover some important documents.
It's worked cool. If you are facing the problem like me download the software from below link.


Share on:
  • ← Previous post
  • This blog is to provide you with daily outfit ideas and share my personal style.
  • Hi, my name is John. I'mstudent originally from Peru, living in New York.
140x140

John Doe

Founder of the website
Facebook Twitter Gplus RSS
Labels
  • Antivirus
  • Blogging
  • Download
  • Facebook
  • Hacking
  • Microsoft
  • Shortcut
  • Software
  • tips tune
  • Ubuntu
  • Utilities
  • Windows
  • You Tube
latest posts
latest comments
Hercules Design @Hercules_group
@billykulpa Please contact us via info@hercules-design.com
Reply Retweet Favorite

06 May 2014

Hercules Design @Hercules_group
@billykulpa Please contact us via info@hercules-design.com
Reply Retweet Favorite

06 May 2014

Hercules Design @Hercules_group
@billykulpa Please contact us via info@hercules-design.com
Reply Retweet Favorite

06 May 2014

This blog is to provide you with daily outfit ideas and share my personal style. This is a super clean and elegant WordPress theme for every bloggers. Theme is perfect for sharing all sorts of media online. Photos, videos, quotes, links... etc.

Facebook Twitter Flickr Linkedin Gplus Youtube

NEXttUNE

সময়ের সাথে প্রযুক্তি এখন আমাদের হাতে।

  • Home
Created By SoraTemplates | Distributed By Gooyaabi Templates